Caring for Your PleurX Drainage Catheter
Overview
When you leave the hospital, there are steps you need to take to care for your PleurX drainage catheter. You will learn more about these later in this guide.
• Check your catheter daily. Is it leaking? Do you see skin changes?
• Drain the fluid from your lung or belly as directed.
• Change your dressing at least once a week. Change it right away if it’s loose, wet, or dirty.
• Plan ahead. Try to change your dressing when you’re draining fluid. That way, you’ll only need to open 1 drainage kit.
Learning to Care for Your Catheter
• Your hospice nurse will teach you how to change your dressing. Your caregiver should also be there to learn how to do this.
• A hospice or home care nurse may visit you at home to help you care for your catheter. They want to help you and your caregiver get comfortable caring for your catheter on your own.
• Use this guide to help you remember what to do.
Checking Your Catheter
Check your catheter every day. Look for any problems or signs of infection. Use a handheld mirror or ask your caregiver for help. Here’s what to look for:
• Check the dressing. Is it wet, dirty, loose, or lifting from your skin? If so, change it. Follow the instructions in the section Changing Your Dressing.
• Check for kinks. Is the tube bent or kinked? If so, straighten it.
• Check for damage or leaks. Is the tube damaged, cut, broken, or leaking? If it is:
1. Pinch the catheter closed between your fingers.
2. Open a drainage kit and take out the blue emergency slide clamp. Push it onto the catheter until the catheter is pinched closed. If you don’t have a slide clamp, bend the catheter and tape it in place.
3. Call your doctor’s office right away.
Draining: How Much, How Often, and Keeping a Drainage Log
Follow your hospice provider’s instructions for how often to drain your catheter. Most people need to drain it every day or every-other-day. Do not change your drainage schedule without talking with your doctor first.
Drainage amount
Your hospice provider will tell you how much fluid to drain and how often to drain it. Follow these guidelines:
• Don’t drain more than 1,000 mL, unless your doctor tells you to.
Call your hospice provider if:
• You drain 200 mL or less for 3 days in a row. They may tell you to drain less often.
• You find that you’re draining less and less fluid over time. Your doctor may recommend removing your catheter.
Drainage log
Every time you drain your catheter, write down:
• The date and time
• The amount of fluid drained
• The color of the fluid
• Any symptoms you have (such as discomfort)
This will help your care team make a schedule that’s right for you. And it helps you see differences in your drainage. Use the drainage log at the end of this guide, or you can make your own.
Have your drainage log nearby if you need to call your doctor’s office about your catheter.
Draining: Steps to Follow
Before you get started
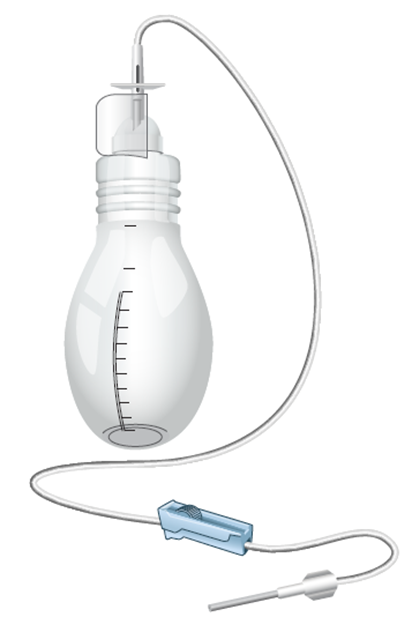
To drain the fluid, you will attach your catheter to a vacuum bottle. The vacuum will pull the fluid into the bottle. Ask your caregiver to help, especially at first.
If you have pain when you drain your catheter, take pain medicine 30 minutes before you drain it. Follow your healthcare provider’s instructions.
Step 1: Gather your supplies. Before you start, set up your supplies on a clean, open surface. You’ll need:
• A PleurX drainage kit. Don’t use a different brand drainage kit without talking with your healthcare team first. The kit includes:
o 1 vacuum bottle (500 mL or 1,000 mL)
o 1 PleurX Procedure Pack. The pack includes:
o 1 self-adhesive dressing
o 1 pair of medical gloves
o 3 alcohol wipes
o 1 valve replacement cap
o 4 (4-inch) square gauze pads
o 1 emergency clamp (Only use the emergency clamp if your PleurX catheter is broken or leaking.)
• An extra pair of medical gloves (if you’re also changing your dressing)
• Extra alcohol wipes
• A trash can
• Your drainage log
• A pen
• Clean your hands
|
 |
Step 2: Clean your hands. Use soap and warm water or an alcohol-based hand sanitizer. If your caregiver is helping, they should clean their hands, too. .
• For soap and water, wet your hands and apply soap. Rub hands for 20 seconds, then rinse. Dry your hands with a paper towel, then use it to turn off the faucet.
• For alcohol-based hand sanitizer, cover your hands with it. Then rub your hands together until they’re dry.
Step 3: Remove the old dressing – if needed. Are you also changing your dressing? If so, take it off before you get your supplies ready. To do this:
• Put on medical gloves.
• Hold the catheter in place with your non-dominant hand (the hand you don’t write with).
• Use your other hand to gently remove the clear dressing and the foam pad.
• Throw them away. Then throw your gloves away. Clean your hands (Step 2) again.
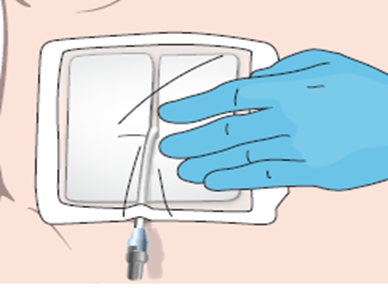
Step 4: Prepare your supplies. Get your supplies ready. If your caregiver is helping you, they should do this.
• Open the PleurX drainage kit.
• Remove the PleurX Procedure Pack pouch and open it.
• Set aside the self-adhesive dressing.
• Spread out the blue wrap. You should see the supplies inside.
If you’re both draining your catheter and changing your dressing, you’ll use all the supplies. If you’re only draining your catheter, you’ll only use the alcohol wipes and valve replacement cap.
|
Step 5: Prepare the vacuum bottle.
• Take out the vacuum bottle. Look at the end of the drainage line.
• Check the hard-plastic access tip.
o Do not let the tip touch anything except the blue wrap. Do not touch it with your hands, even if they are clean.
o Make sure the tip is covered with a soft plastic sleeve. The sleeve keeps the tip clean while you’re setting up. If the plastic sleeve is missing, start over with a new drainage kit.
• Set the bottle near the blue wrap.
o Take off the paper holding the drainage line. Throw the paper away.
o Place the access tip on the blue wrap.
o Put on the gloves in the PleurX Procedure Pack. Do not to touch anything else in the pack.
o Open the 3 alcohol pad pouches – but leave the pads in the pouches. Place the pouches on the blue wrap.
|
 |
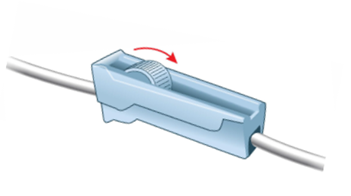
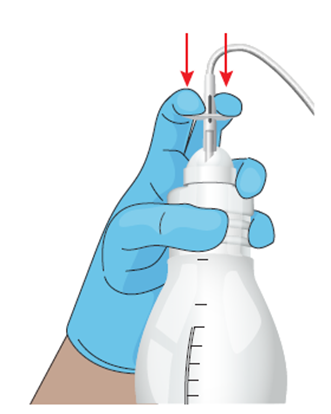
Step 6: Close the roller clamp.
• Rolling the wheel toward the drainage bottle.
• Make sure it’s completely closed.
|
 |
|
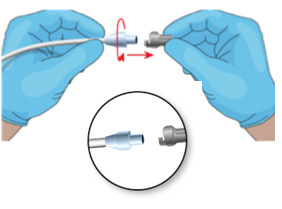
Step 7: Remove the soft plastic cover from the access tip.
• Twist it and pull gently. Throw away the cover.
• Set the access tip back on the blue wrap.
|
 |
Step 8: Get ready to connect the drainage line.
• If your caregiver is helping: They should hold your catheter away from your body while they clean the valve and connect the drainage line.
• If you are doing it yourself: Use your non-dominant hand (the hand you don’t write with) to hold your catheter away from your body. Use your other hand to clean the valve and connect the drainage line.
Step 9: Remove the catheter valve cap.
• Twist off the valve cap. Throw the cap away.
• Keep holding your catheter away from your body. Make sure the valve doesn’t touch anything.
Step 10: Clean the catheter valve.
• Use an alcohol pad. Thoroughly wipe the valve for 15 seconds. Throw the pad away.
• Keep holding your catheter away from your body. Do not let the valve touch anything.
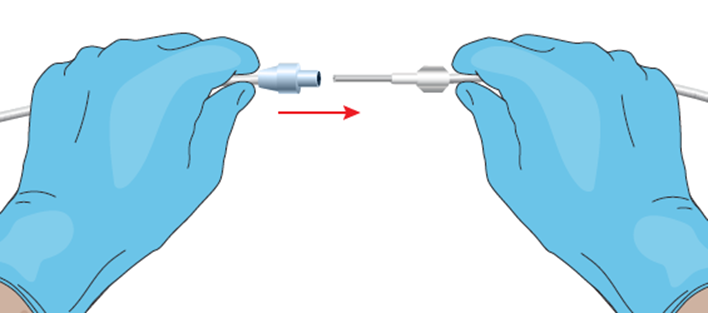
Step 11: Push the access tip of the drainage line into the clean catheter valve.
• You’ll hear and feel a snap when the tip and valve lock together.
• Never put anything other than the access tip into the catheter.
.
|
 |
|
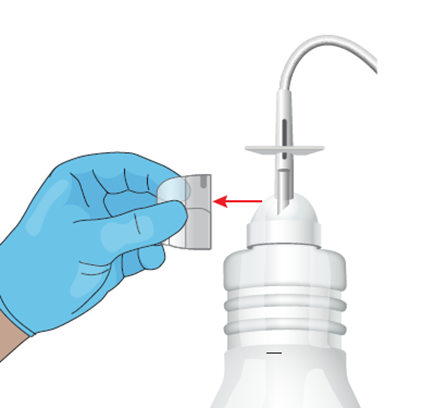
Step 12: Remove the support clip beneath the T-plunger.
• Hold the flat part and pull it outward. Throw the clip away.
• Do not press the T-plunger down yet.
|
 |
|
Step 13: Hold the drainage bottle with one hand. Push down on the T-plunger to break the seal and start the vacuum.
|
 |
|
Step 14: Start draining the fluid.
Now you can drain the fluid. You may want to do this part yourself, even if your caregiver is helping. This lets you adjust the flow of fluid if you feel discomfort.
• Slowly roll the wheel on the roller clamp away from the bottle.
• Fluid should start flowing into the drainage line.
|
 |
Step 15: Control the flow.
• To slow the flow of fluid, roll the wheel on the roller clamp toward the bottle. This will partially close the clamp to slow the flow of fluid.
• If you feel pain or start to cough, slow the flow of fluid.
• If you still have pain:
o Stop draining.
o Disconnect and empty the drainage bottle.
o Then call your doctor’s office right away.
Step 16: The flow of fluid will slow.
• As you drain the fluid, the flow will slow on its own. This is because all the fluid has drained or because the bottle has lost suction. This is normal.
• You may see more foam or bubbles as the flow slows.
|
Step 17: When the flow stops or the bottle is full, disconnect the drainage bottle.
• Close the roller clamp. To do this, roll the wheel towards the bottle as far as it will go.
• If your caregiver is helping you: Hold your catheter away from your body. Let them disconnect the bottle.
• If you are doing it yourself:
o Use your non-dominant hand to hold your catheter away from your body.
o Use your other hand to disconnect the drainage bottle.
• Check that the roller clamp is completely closed.
• Hold the end of your catheter away from your body.
• Pull the access tip of the drainage line out of the valve. Do this in a firm, smooth motion.
• Set the access tip down.
• Keep holding your catheter away from your body. Make sure the valve doesn’t touch anything
|
 |
Do you need to drain more than 1 bottle?
In some cases, you may need to fill more than 1 drainage bottle. For example, you may be using a 500 mL bottle, but your doctor told you to drain more than 500 mL.
In that case, you will need to connect another bottle and finish draining:
• First, disconnect the full drainage bottle (see Step 16).
• Second, clean the catheter valve with an alcohol pad for 15 seconds.
• Third, connect a new drainage bottle and repeat Steps 5 through 16.
|
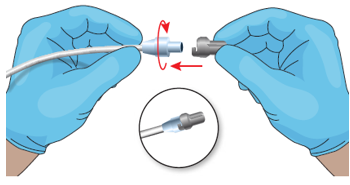
Step 18: Clean the valve and replace the cap.
• Clean the valve thoroughly with an alcohol pad for 15 seconds. Throw away the wipe.
• Keep holding your catheter away from your body. Make sure the valve doesn’t touch anything.
• Pick up the replacement valve cap. Do not touch the inside.
• Place the new cap over the clean catheter valve. Twist the cap clockwise (to the right) until it snaps into lock position.
• If you touch the inside of the valve cap, throw it away. Keep holding your catheter away from your body. Open another drainage kit and PleurX Procedure Pack and use a new valve replacement cap.
|
 |
Did you plan to change your dressing at the same time?
If so, keep your gloves on. Follow the steps in the section How to Change Your Dressing.
Step 19: Empty the drainage and throw away the bottle(s).
• Make sure the clamp on the bottle is closed tight.
• Remove the top of the bottle by pushing up on the rounded end of the bottle opener.
• Remove the bottle opener from the drainage line by squeezing the flexible cap and pulling the bottle opener off.
• Use the pointed end of the bottle opener to widen the foil opening in the drainage bottle. This will make it easier to empty the bottle.
• Empty the drainage into the toilet.
• Place the drainage bottle and tubing in a plastic bag. Seal the bag tightly. Throw it away with your household garbage.
Step 20: Fill out the drainage log. Do not forget this step.
• Write down the drainage amount.
• Describe any changes in color or thickness from earlier draining. Tell your hospice or home health provider about the changes.
What to Do if Fluid Does Not Drain
If no fluid drains from your chest into the vacuum bottle:
• Make sure the T-plunger at the top of the vacuum bottle is pushed all the way down.
• Make sure the drainage line is securely connected to the catheter valve.
• Make sure the roller clamp on the drainage line is open.
• Make sure there aren’t any kinks in your catheter.
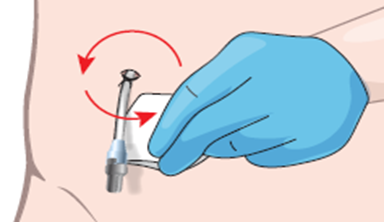
• Check if your catheter is clogged. If it is, roll it between your fingers. This will help loosen any blockage.
If these steps don’t work, repeat the drainage procedure with a new drainage kit. If fluid still isn’t draining, you may not have fluid in your pleural space to drain. Call your doctor if fluid isn’t draining.
How to Change Your Dressing
It’s best to have someone help you change your dressing. The word “you” here refers to the person changing the dressing.
Step 1: Gather your supplies.
Before you start, set up your supplies on a clean, open surface. If you just drained your catheter, use the supplies from that drainage kit. If not, open a new PleurX Drainage Kit and PleurX Procedure Pack.
Here’s the supplies you will need:
• 1 alcohol pad
• 4 (4-inch) square split gauze pads
• 1 self-adhesive dressing with 3 layers
• The printed liner – this covers the sticky side of the dressing
• The clear wound dressing – this stays over your catheter exit site once you’re done
• The paper border around the dressing – this border helps you handle the dressing while you put it on
• 2 pairs of medical gloves – if you did not already taken off your dressing
• A trash can
Step 2: Clean your hands. Use soap and warm water or an alcohol-based hand sanitizer. Both patient and caregiver should do this.
• For soap and water, wet your hands and apply soap. Rub hands for 20 seconds, then rinse. Dry your hands with a paper towel, then use it to turn off the faucet.
• For alcohol-based hand sanitizer, cover your hands with it. Then rub your hands together until they’re dry.
Step 3: Remove the old dressing.
• Put on a pair of medical gloves.
• Hold the catheter in place with your non-dominant hand (the hand you don’t write with).
• With your other hand, gently remove the clear dressing and gauze over the catheter and the foam pad under the catheter.
• Throw them away.
Step 4: Clean your hands again.
• Take off your gloves.
• Clean your hands as in Step 2.
• Then put on a new pair of gloves.
|
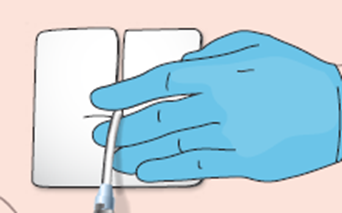
Step 5: Clean the skin around the catheter.
• Your healthcare provider will tell you if you should use soap and water or an alcohol wipe.
• Follow their instructions.
|
 |
Step 6: Check the skin around the catheter.
• There should be no redness, areas of broken skin, rash, or leaking fluid.
• If there is, call your healthcare provider after you change the dressing.
• Let the skin around the catheter air dry for 30 seconds.
|
Step 7: Place new pads under and over the catheter.
• Once the skin is dry, place the gauze pad under the catheter.
• Then place the new foam or gauze pad over the catheter. You can help your caregiver by holding the gauze in place while they do the next steps.
|
 |
Step 8: Take off the gloves. Throw them away.
|
Step 9: Apply the new dressing.
• Peel off the backing from the self-adhesive dressing to expose the sticky side. Throw the backing away.
• Center the self-adhesive dressing over the gauze pads. Press it down against your skin.
• Do not stretch the dressing when you put it on.
• Your healthcare provider will tell you if the tip of your catheter should be under or over the dressing. Follow their instructions.
• Slowly peel off the paper center panel and frame.
• Smooth and press the dressing down onto the skin.
• Make sure it’s completely secure. Throw the paper center panel and frame away.
|
 |
Step 10: Clean your hands again.
• Take off your gloves and throw them away.
• Clean your hands as in Step 2.
Taking Showers with Your Catheter
To shower with your catheter in place, you must use a waterproof cover over your dressing. Each time you shower, cover your dressing completely with a new waterproof cover.
• Place the waterproof cover.
o If you do not have a waterproof dressing cover, kitchen wrap can be used to cover the dressing. Tape it to your skin above and below the dressing, and on both sides of your dressing, to keep your dressing dry.
o Put the top edge of the cover above your dressing.
o Don’t let the tape on the cover touch your dressing. It could lift your dressing when you remove the cover after showering.
o Smooth the cover down over your dressing.
o Peel off the bottom strip.
o Make sure the bottom edge of the cover is below your dressing and the end of your catheter is tucked into the cover and fully covered.
o Smooth the bottom edge down.
• Take your shower.
o Do not shower longer than 15 minutes.
o Use warm water – not hot. Hot water could cause the cover to come off.
• After your shower, dry the waterproof cover before you take it off.
o If your dressing gets wet, change it.
o If a wet dressing is left against your skin, it can irritate your skin.